1. Choose a starting point
You can design a simple functional 3D print without learning a CAD interface first. In Extrudely, start with a measured generator, copy an editable community design, or describe a part to the AI OpenSCAD generator. You still make the decisions about size, fit, and how the part will be used.
For your first project, choose an organizer, spacer, holder, or simple adapter. A drawer tray is a useful starting point: its outside dimensions, walls, and compartments are easy to inspect. Detailed sculptures and complex assemblies need a different approach.
The two generators in this guide build their starting models without an AI request. Previewing them needs no account; saving one to your studio uses a design from your account allowance. AI-assisted changes depend on your plan or connected provider.
- Know the shape and measurements? Use a generator.
- Found a close match? Copy a public marketplace design to your private library.
- Need a different shape? Describe it to the AI and refine one feature at a time.
2. Measure the space and the things that must fit
Write down dimensions in millimeters before opening the generator. Measure the usable space rather than the outside of the surrounding object. A drawer’s inside width, inside depth, and usable height can be smaller than its advertised size.
Check for screw heads, curved corners, runners, and anything above the drawer that could catch the tray when it closes. Use the smallest usable measurement if the space varies. Record what each number means so you do not swap width and depth later.
- Outside size: how much space can the part occupy?
- Fit surfaces: which holes, openings, or edges need to match another object?
- Clearance: how much room should remain between touching parts?
- Printer limits: will the finished outside dimensions fit the usable build volume?
3. Work through a drawer organizer example
Open the drawer organizer generator and use the example dimensions below. These are an example configuration, not measurements for your drawer. Replace them with your own before saving a design.
| Setting | Example value |
|---|---|
| Inside drawer width | 180 mm |
| Inside drawer depth | 240 mm |
| Usable drawer height | 50 mm |
| Compartments | 2 columns × 3 rows |
| Wall and divider thickness | 1.6 mm |
| Base thickness | 1.6 mm |
| Side and top clearance | 1 mm |
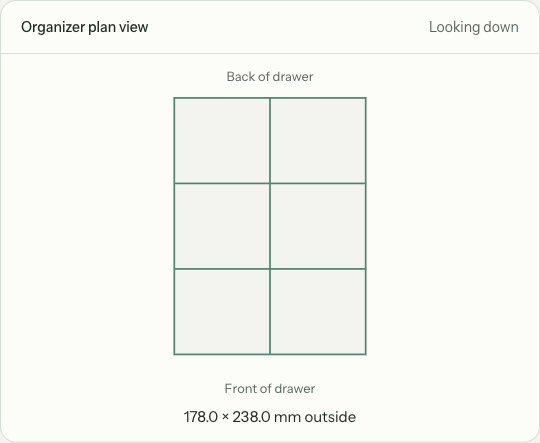
In this generator, clearance is removed from both sides of the width and depth, and from the top of the height. The example therefore produces a tray with outside dimensions of 178 × 238 × 49 mm. Wall and base thickness reduce the space inside each compartment.
Use the plan view to check the layout, then select “Preview in 3D” to inspect the shape. If the tray is larger than your printer can handle, reduce the dimensions or plan separate smaller trays. This generator does not automatically split the model into printable sections.
When the layout looks right, save the settings and sign up, or create the organizer if you are already signed in. The saved starting model opens in your studio, where you can inspect its parameters and continue editing.
Try the drawer organizer example →4. Describe changes with dimensions
For a part that does not match a generator, describe its purpose, overall shape, and important dimensions. Ask for the dimensions you expect to change to be exposed as parameters. You can also use chat to request changes to a saved starting design.
A useful starting prompt names the parts of the model and how they connect. Avoid relying on phrases such as “standard size” or “make it fit” when you have an actual measurement.
Create an open rectangular desk tray with outside dimensions of 120 × 80 × 25 mm, 2 mm walls, a 2 mm base, and two equal compartments. Expose the outside width, depth, height, wall thickness, and divider position as adjustable parameters.
Inspect the result, then request one change at a time: “Move the divider so one compartment is 30 mm wide inside.” Check whether the requested dimension describes the inside or outside of the tray. Do not assume the AI interpreted every measurement correctly.
Exposed parameters can be adjusted with the available controls. Preview the changed geometry and save a new version when ready. Keep the editable OpenSCAD source if you want to inspect the model definition or continue working outside Extrudely.
Explore the AI OpenSCAD workflow →5. Check fit: clearance is not the same as size
A measured opening and a printed part with the same nominal dimension may not fit together. Leave a deliberate gap where needed, then test it with your printer and material. The appropriate clearance depends on the fit you want and the results of your printing process.
The hose adapter generator makes the distinction visible. Choose whether each end fits over the outside of a connection or inside an opening, and measure the corresponding surface.
For an end that fits over a measured 32 mm connection, 0.4 mm diametral clearance produces a 32.4 mm internal diameter. That is 0.2 mm per side. For an end that fits inside a measured 32 mm opening, the same clearance produces a 31.6 mm outside diameter. These are calculated model dimensions, not a guaranteed printed fit.
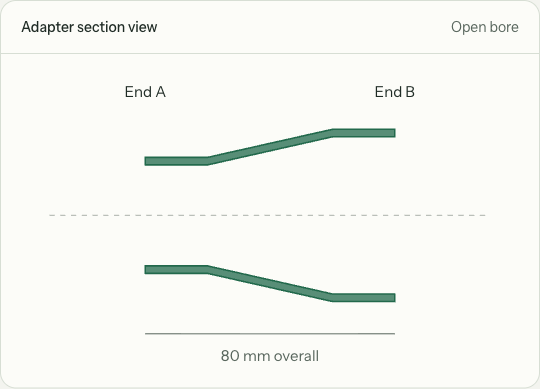
Print a short fit sample before committing to the whole part. If it is tight, change the clearance and test again. The organizer’s side clearance and the adapter’s diametral clearance describe different gaps; do not transfer a number between them without checking its meaning.
Further reading: Prusa’s guidance on tolerances, orientation, and supports.
Try the hose adapter generator →6. Export a saved version and check it in your slicer
A model preview shows the shape; your slicer prepares that shape for a specific printer and material. In the studio, save the version you want to print, then choose an export format.
| Format | Use it for |
|---|---|
| STL | Importing the model geometry into a compatible slicer. Check the imported dimensions and scale. |
| 3MF | Importing the model into a slicer that supports 3MF. Extrudely’s model export does not replace selecting printer and material settings. |
| OpenSCAD | Keeping the editable source for further model changes. This is not a printer instruction file. |
Choose your printer and material profile in the slicer. Check the outside dimensions, placement, orientation, supports, and layer preview. Then generate the printer instructions using that slicer’s workflow. Save a slicer project separately if you want to retain its settings alongside the model.
- Confirm the imported dimensions match your intended outside size.
- Check the part against the usable build area, including any brim or supports.
- Look for unsupported features and inspect how each layer will be built.
- Start with a fit test when the part must match another object.
- Record the design version, material, settings, and what you changed after the test.
For the distinction between model geometry and slicer project settings, see Prusa’s guide to saving 3MF projects.
Choose one small project and iterate
Start with a part you can measure and a result you can check. Keep the first version simple, test the important fit, and make one deliberate change at a time. Once you have printed a design, add your own print notes and photos to its marketplace listing if you choose to share it.
Find an editable starting design →Go deeper with guides to STL and 3MF, fit tolerances, OpenSCAD, and parametric editing.
Make your first editable model
Bring your measurements and start with a small, practical part. Save versions as you refine it.
Create your free account